COVERGIRL: Lipperfection Jumbo Gloss Balm

Saturday, February 22, 2014


Hey guys! It's been a while since my last post. I haven't had much spare time to make reviews lately but I plan to do at least three on products I've been loving so far hopefully before February ends. 


I recently browsed the beauty section of Landmark Trinoma and bought several items I've been meaning to try out. Covergirl Lipperfection Jumbo Gloss Balm tops my "must try" list which is why my smile was from ear to ear when I saw a variety of shades on display. After trying on a dozen of them, I found myself torn between two shades. So to save myself the trouble of having to choose just one, I got them both!


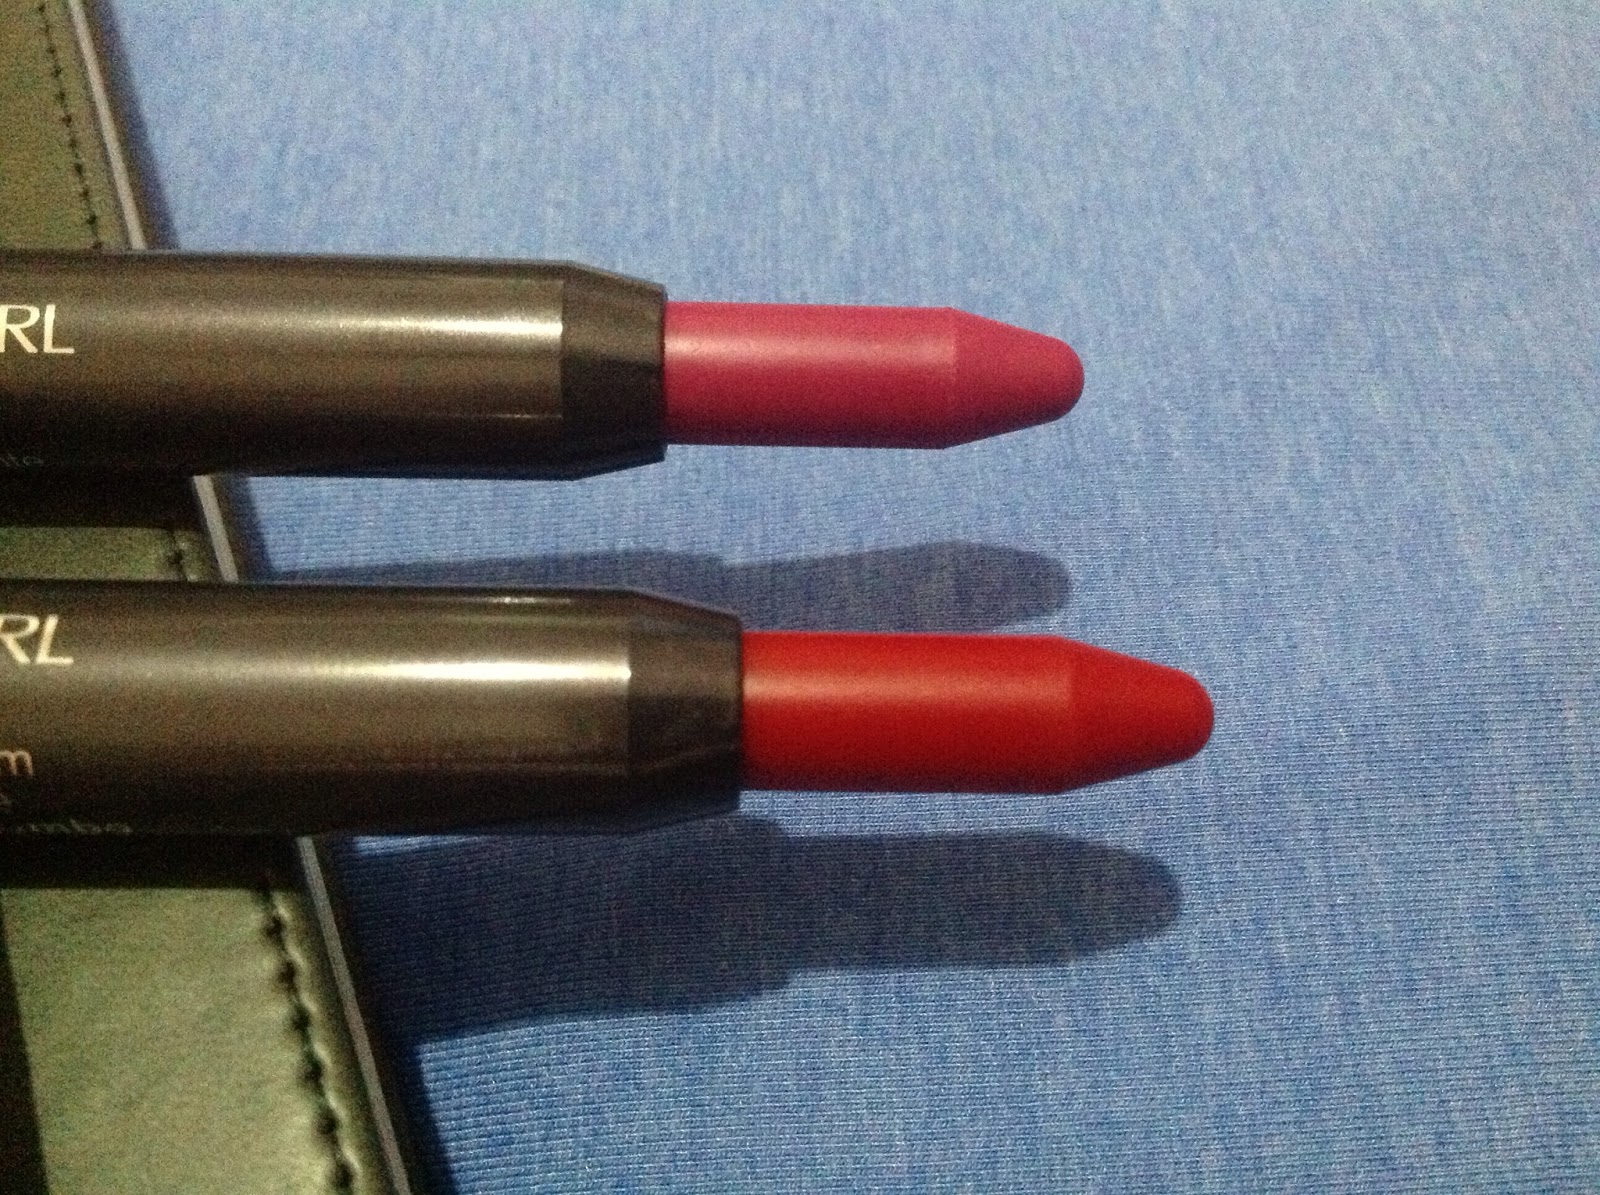
First shade that got my attention was #230 berry twist. The packaging is pretty much the same as the other jumbo lip balms except that the shade name is printed on the wrapper. Better try to remember the shade name because you won't be seeing them once you've peeled off the seal. Although you can still check out the shade number on the base.


Berry twist, as expected, shows off a color between red and purple. I love how it looks youthful yet professional. It's the kind of color you can actually wear everyday to work. 


Shade #250 scarlet twist was my second pick from the bunch. 


I have to admit, I got a little intimidated just by looking at the stick's bright red color. I almost didn't try it on but I'm glad I did because the shade is really pretty! Not the scarlet red that ages you, but a gorgeous red that screams of sophistication. This is suitable for an everyday look but you can also get away with it on a night out with friends. 


These jumbo lip balms are virtually unscented. The stick may look matte but the formula is quite moisturizing that it glides smoothly on your bare lips. The shade falls between sheer to medium but is pretty much buildable to give your puckers a pop of color. I also love that it gives a subtle shine and a touch of tiny sparkles. 


Staying power isn't as impressive which I don't really mind since I love reapplying these often. The Covergirl Lipperfection Jumbo Gloss Balm may not be as pricey at 450 Php compared to Clinique Chubby Sticks that go for 950 Php but it's not cheap either especially when the stick is only around 3.8 grams and not even over an inch long. 


Image courtesy of Covergirl

Despite the price, I still recommend this product to those of you who want an affordable yet good quality jumbo lip balm. I'll be buying several other shades in the future, besides, one can't have too many lip products right? So have you tried these lip balms from Covergirl? What are your thoughts? Do leave them on the comments section below. Thanks for reading and have a beautiful day!


♥♥♥

NATURACTOR: Cover Face Concealer

Friday, February 14, 2014


Happy Valentine's Day everyone! It took me a long while to do another entry due to unexpected network problems. This is why I didn't get to RAVE about a product I've been enviously wanting to try, the Naturactor Cover Face Concealer.


I was quite surprised how small the box was when I got it last week from Christine, owner of The Fab Panda who happens to be a good friend. 


This comes in several other shades and #151 is the one nearest my NC 30 complexion. 


The product is simply housed in this 20g plastic jar.


Above image shows you how the concealer looks upon opening. 


I've been using this for more than a week now not only as a concealer on targeted areas but all over my face as well especially when I feel like I need more coverage. It only takes a light hand to swipe over it and get your desired amount. See how little I've used so far? This proves that a tiny bit goes a long way and at the rate I'm going, this will definitely last me a long while. 


I'm incredibly impressed of the creamy texture and how a few dabs is all you need to spread the product all over your face. It initially appears to settle in your creases but eventually gives off a flawless matte finish after blending. 


You can achieve medium to full coverage as demonstrated on the image above. See how my scar vanished under the concealer? This stays on for about 4 hours without creasing and gets a little shiny by the end of the day. It's also unscented, feels so light on the skin and didn't break me out. 


Overall, this concealer rocks beyond my expectations. I love that it matches my shade and that it offers medium to full coverage. Coming from a girl who rarely uses concealer until naturactor came along, I can confidently say that this product amazingly does wonders. Naturactor is a Japanese brand which retails for 650 to 700 Php in online shops but you may get this from a trusted seller The Fab Panda for only 500 Php exclusive of shipping fee. Any thoughts on naturactor? Do let me know via the comments section below. Thanks for reading and have a wonderful weekend!


♥♥♥


SASA: Shu Uemura S Curler Dupe

Wednesday, February 5, 2014


Hey guys! I've been wanting to try Shu Uemura's S Curler for the longest time but the price has kept me from buying one. Good thing a friend who recently travelled to Hong Kong found me a dupe from Sasa. 


This post is just a quick review on this new tool, the KOJI Eyelash Curler which looks and functions pretty similar with the S Curler.  


This tool is housed in a hard plastic box and as you can see on the back it only retails for HK $49 or 300 Php.


If you're not familiar with the Shu Uemura S Curler, there's a really big possibility you'd mistake this tool for a tweazer. 


Above image shows that the S Curler dupe looks smaller compared to a regular eyelash curler. 


It may also look peculiar since the portion intended to curl your lashes is quite narrow but the innovative design allows you to curl hard to reach lashes like those on the inner corners of your eyes. The downside is it takes a while until you get your desired look since you have to go around each eye 3 times. 


See how it looks so tiny compared to the regular eyelash curler? I was also concerned about getting my eyes poked when I first tried this tool but I eventually got the hang of it. Best tip I can give you is to let the metal part rest on your eyelids then curl away. You also need to use this tool carefully because it tends to pluck some of your lashes.


This eyelash curler came with a spare rubber. You can see it only spans 1 centimeter so if you have wider eye lids you may need to go around your lashes more than several times. 


Here's a comparison shot to give you a better idea of the size.


Overall, I think this tool is quite promising. I love that the design allows you to curl hard to reach areas like the corners of the eye. It effectively curls your lashes once you get accustomed to the proper way of using it. Sadly, I can't highly recommend it to everyone especially busy ladies who want a speedy morning ritual. This tool might frustrate you when you're in a hurry because it takes a little more time to use. It's not at all a bad tool because you can still use it with your regular curler although using it alone is a totally different story. 


I can't say for sure if the Shu Uemura S Curler does a better job but I'll keep you posted once I get the chance to try it. So what are your thoughts? Do share them with me on the commnets section below. Thanks for reading and have a great day!


♥♥♥


CLINIQUE: Makeup Tutorial Session

Monday, February 3, 2014


Hey guys! A few days ago I was fortunate enough to get a complimentary makeup tutorial from Clinique. A good friend got me into it and I'm so thankful she did because I really had an amazing time!


I chose to attend the session in Clnique Trinoma and was too eager I went there a couple of hours early. Miss Catherine Panteria or Cathy was the accredited consultant who assisted me. She asked basic questions about my skin then started assembling the products needed for the tutorial. 


I love that Cathy began with Clinique's 3-Step System which consists of cleansing, toning and moisturizing the skin before applying makeup.


Next was to find the foundation shade for my skin tone. Although there were an array of shades available, my perfect match turned out to be a combination of two, cashew and warm sunny. Cathy used a wedge sponge and initially tried the mixture on my jaw line. After seeing how it looked, she began spreading it all over my face with a patting motion. I was really impressed with how light and natural it looked on my face. 


My eyelids were primed with the Clinique Lid Smoothie in Bit O' Honey. It has a creamy texture that applies easily, giving your lids a pop of color with a bit of shimmer. You may use this alone for an everyday look but it can also serve as your primer if you want to blend more colors. 


I almost gasped for air after seeing the intense colors from the palette. I'm used to neutral shades so this was just what I needed to break away from my usual look. 


One technique Cathy taught me was how to create cat's eye with a swipe of a pointed cotton tip applicator. It totally blew my mind how a polished look can be achieved in a simple swipe. The Clinique Quickliner For Eyes Intense (#01 Intense Black) glides on smoothly with very minimal to zero tugging. It comes with a pointed sponge tip on one end and a retractable stick on the other. 


There were two types of mascaras used on my lashes, one for lengthening and another for curling. How I wish they come in one tube because they really work well together. Both dried off easily without clumping and made my lashes look more noticeable. 


If I were to choose a favorite in my entire look, it would be my brows. Thanks to Cathy's skilled hands and Clinique's Quickliner For Eyes Intense (#03 Roast Coffee), my brows looked naturally tamed. I love that the shade matched me perfectly, not at all villain or monster looking the way I always tend to make my brows look whenever I try grooming them. 


My under eye areas have always been a problem but thanks to Clinique's All About Eyes Concealer, they became less noticeable with just a few dabs.


My cheeks were contoured with the Clinique Powder Blush in Enchanted Bronze. This was layered with the shade Berry Delight that added a lovely flush to my skin. You may want to use this sparingly or apply it using light pressure because it can be a bit shimmery when overdone. 


For the lips, a combination of two shades of the Chubby Stick Intense were used, Curviest Caramel and Broadest Berry. I never imagined them to appear good when layered together but thank goodness they do. 


My entire look was finished off with Clinique Translucent Loose Powder. It's an effective product that takes the shine off revealing a natural matte finish. 


This is my finished look! Many thanks to Clinique Philippines' generosity and the expertise of their accredited consultant Cathy, I was granted with a much needed makeover. I had everything done in an hour and this look lasted until late night with minimal creasing of the eye shadow and a few shine on my T-zone. 


Clinique's hospitality didn't end with a makeover, they also gave us wonderful treats just in time for Chinese New Year! Different sets of Clinique products were prepacked and ready to be given away.


Can you beleive I got these for FREE?! It's like experiencing Clinique Bonus Time minus the hefty purchase. I'm so happy about the set I got because it contains everything I've been aching to repurchase like the Moisture Surge Extended Thirst Relief (7 ml), All About Eyes (5 ml), Long Last Lipstick in All Heart and sachets of Repairwear Laser Focus Wrinkle & Photo Damage Corrector. So what are you waiting for? Book a makeup tutorial now with Clinique and have all your questions about skin care and makeup answered by no less than their excellent team of consultants. 


♥♥♥


SHISEIDO: Ibuki Softening Concentrate

Saturday, February 1, 2014


Hey guys! How are you enjoying your new year? Did you ever get to make a resolution? For me, I've given up on making a list and just thought of a main objective I hope to accomplish this year, become a better version of myself. So far, I'm so happy to say that I've been more relaxed and appreciative of the things around me. 

As part of my "better-version-of-me" goal, I've also decided to be more consistent with sticking to a skin care line and see the long term effects before jumping from one brand to another. After giving much thought and considering so many factors, I finally decided to start my skin care journey this year with Shiseido Ibuki.


I got to try Shiseido Ibuki for the first time via Sample Room and fell in love with the softening concentrate which is why I chose it among the other Ibuki products. The full size comes in a 75 ml bottle which I'm pretty sure will last me a long while. 


I like how the box is labelled with the expiration date. This way you get a reminder not to take forever to consume it. I don't know about you but I tend to save every single drop of a product I love to extend its use so the expiration label really matters.


Don't you just love how the pearly white bottle looks? 


The cap has a safety seal to ensure good quality. Pulling the it off reveals a small nozzle and a pump to easily dispense the product. 


This softening concentrate appears translucent and has the consistency of a runny gel that immediately flows on application. Gel-like toners aren't new to me since I already tried one before from Tony Moly so I wasn't surprised about this at all and actually prefer them over liquid toners. I can't make out the scent but it's so mild you wouldn't detect it after a few minutes. It spreads easily and lingers a little while before getting absorbed so your skin will look a bit shiny at first. It dries off fairly quick so you have to wait a while before using a moisturizer or BB Cream on top.


I've been using this product for more than 2 weeks now and I'm pretty much satisfied with what I see. My skin feels smoother, post blemish marks look lighter and it didn't cause further break outs even during my period. By the way, I asked the sales rep for samples and they gave me 4 sachets of the Ibuki softening concentrate. It really pays to ask for samples so please get over being shy and do so! 


Overall, the Ibuki softening concentrate from Shiseido truly delivers! It did help soften and clarify my skin in just two weeks. Although you may need to have a facial before starting with a new skin care line for optimum results. The price may seem a bit steep but considering the small amount of product needed to cover your face, size of the bottle (75 ml) and the overall performance of this product, the 1,600 Php tag is well worth the splurge. The entire Ibuki line is available in all Shiseido branches nationwide. Visit anytime to talk to their lovely sales reps who will gladly assist you with any of your skin care related concerns. Thank you for reading and have a great day!


♥♥♥