SHU UEMURA: UV Under Base BB Mousse

Friday, April 27, 2012

          Those of you who read my recent posts won't be surprised when I plead guilty of being a BB Cream freak. Yes, I totally admit that I'm crazy about BB Creams. Fortunately after trying 4 different brands, I found the best one for me which I've been using everyday without fail. This is Tony Moly's Luminous Goddess Aura BB Cream. But my search didn't end there, I kept my radar on for updates on this most raved about product. My utmost patience was finally paid off one day when I got this..


          Shu Uemura UV Under Base BB Mousse.. Emphasis on the MOUSSE. You know how devoted you can be to one product that really works well despite of some minor flaws? One thing I'm not so crazy about BB Creams is the texture. Creams are actually meant to be thick since they are intended for dry skin so when you have oily or combination skin (like me), using creams can be a little tricky and entails a few techniques to get your desired effect. 

          What I usually do before I put on my BB Cream is to apply a matte primer underneath so it can balance the cream's thickness leaving a dewy texture instead of a greasy looking finish. I am currently using Tony Moly Luminous Sheer Base which I reviewed about a month ago.


          In the middle of the day when my skin starts getting a bit oily, I just pat a piece of Kleenex Facial Oil Blotter on my face and dust it off with loose powder. But with Shu Uemura UV Under Base BB Mousse, you can do away with the oil blotter and loose powder. This is the beauty of this product, no need to  worry about your face getting oily. Mousse is actually air whipped liquid so the texture falls between that of a liquid and cream and is best used for normal to oily skin.


What I LOVE about this product:
  • It has a foamy consistency that spreads easily and blends effortlessly. 
  • The color beige might look a little fairer at first but it surprisingly matches my skin tone as instantly as it dries. 
  • It has medium coverage that can hide redness and uneven skin tone.
  • It has a natural matte finish without the aid of a finishing powder so you can just use this alone to achieve an everyday look or underneath makeup for a more dolled up finish.
  • It offers protection against UVA (PA+++) and UVB (SPF 30). 


Certain things I find not too appealing:
  • The price (PhP 2,100) is quite steep for a 66g product.
  • Drying time is too fast hence you need to speed up when applying and blending it.
  • It may take some time before you master how the pressurized dispenser works. I practiced on the sample can in the Shu boutique so I'll have an idea on how much pressure I need to pump and dispense just the right amount.
          Overall, I am currently devoted to this product though I still use my other BB creams in between. I highly recommend it to those with normal to oily skin or combination skin type if a natural matte finish is desired. I will definitely save up to buy a replacement but I might be using my other favorite BB creams before I have enough money to repurchase.


RELATED POSTS:


NOTES:
  • All products mentioned in this blog are personal preferences and purchases and are in no way intended for advertisement.


SHU UEMURA: Eyelash Curler

Wednesday, April 25, 2012

          Just recently, I went to Trinoma Mall and as I exited Landmark on the 3rd level, an unfamiliar sight caught my attention. It was a Shu Uemura stall which was originally located at the ground floor level. Well I have to say good move on their part for transferring to a busier location.

          I was literally drawn to their stall. Though I wasn't really planning to make any purchase, I walked right up, looked around and saw their highly acclaimed eyelash curler.

ShuUemura.com

          I've read so many bloggers rave about the wonders that Shu Uemura eyelash curlers can do. Some  people say it's the holy grail of eyelash curlers but I never bought one for several reasons:

1. I have thin, short, stubborn eyelashes.
          I love doing eye makeup but when it comes to my lashes, I've given up hope in making them stand out. I tried several tools such as Model Co's lash wand, Sally Hansen's as well as Elf's and several other generic eyelash curlers but none of them worked for me. I always ended up with awkwardly FOLDED lashes. I have tried every technique there is, like heating the metal part of the curler with a blow dryer, using a lash conditioner prior to curling, running the curler from root to tip and so on but to no avail.

2. The design is so simple and very much similar to cheaper brands.
          This idea made me hesitant for a long time. I came to the point of judging even before trying it myself. I was thinking, how could a similar looking tool be different from the others?
         
3. I can't afford to waste P1,090 for a makeup tool that I don't even know will work for me.
          When I found out about the price years ago, I wasn't at all discouraged but I was also thinking why should I buy a more expensive brand of the same tool that I know will not work for me. But because I believe that experience is the best teacher (most of the time), I didn't entirely trash the idea of getting one.

          These were the things that kept me from purchasing the Shu Uemura eyelash curler despite the many claims and great reviews of bloggers and you tubers worldwide. However, these hesitations were all set aside when I got hold of my own Shu Uemura eyelash curler. Yes, I did make a purchase after all. Make that "purchases" because I couldn't resist buying their BB Mouse after sampling it on my chin. I'll be posting a separate review on this next time.


          Back to eyelash curler, this tool gave me the satisfaction of owning curled lashes with just a simple stroke. I was really surprised when my lashes cooperated and were curled to my fancy even without mascara or lash conditioner. Now I know why it was dubbed as the holy grail of eyelash curlers. It can make wonders on its own. 


          Don't let the simple looking design of this tool fool you into thinking that it's no different from the others. At first glance it may look very much like other cheaper brands but after trying it for the first time and comparing it side by side with another curler, I noticed some small details that might have made the big difference. 


          The Shu Uemura eyelash curler is more slanted than the others creating a 30 degree angle between the proximal handle and the surface of your face. This way, you can easily approximate the curler on your eye area, giving you space to manipulate the curler in any direction without the handle getting in the way. This is a classic problem encountered when using other curlers.

Shu Uemura Eyelash Curler

          The Elf eyelash curler for example is designed in such a way that the handle comes in close contact with your face leaving very little space between them. This limits the curler to dig farther into your eye area to access the lashes. Those with deep set eyes may have a problem using such tool.

Elf Eyelash Curler

          Shu Uemura has a very flexible silicone rubber pad that doesn't crease easily. Though the packaging suggests pad replacement after approximately 3 months of daily use, most of the reviews say that it can last more than 3 months and may even reach more than a year. To ensure maximum precision, they also suggest replacement of the entire tool after wearing out the extra pad included in the package. This is why Shu Uemura doesn't sell separate pads. If you don't feel like discarding the entire thing, you may want to find refill pads from other brands. Some of the reviews say that Shiseido refill pads have the closest match.


Shu Uemura silicone rubber refill pads (L), Elf (R)

          After finally trying this revolutionary tool myself, I could say that Shu Uemura eyelash curler is worth every centavo. If you still find it otherwise, I suggest you try using it before you jump to any conclusions. Try using one by borrowing from your friends or dropping by any Shu Uemura boutique. Who knows, you just might love it the way I and a lot more people do.


NOTES:

  • Now all I need to do is find the perfect mascara to work with this amazing tool. Any suggestions?
  • I heard Maybelline and Revlon mascaras work well.
  • My take on the Shu Uemura BB Mouse is up next.
  • As always, products mentioned in this review are personal purchases and preferences and are in no way intended for advertisement.


Cleaning Your Makeup Brushes

Wednesday, April 18, 2012

          To stay away from pimples, you need to maintain the cleanliness of not only your face but also the things that come in constant contact with it. These include your hands and your make up paraphernalia such as sponge applicators and most importantly makeup brushes. I've had a few instances when I would trace the possible cause of my pimple break outs down to not having been able to judiciously clean my makeup brushes. Now I really make it a habit to clean them as often as I possibly can.

Perfectmakeups.com

          To keep your face healthy, you need to clean your brushes regularly by spot cleaning them every after use or deep cleaning them at least once a week.

          Spot cleaning is when you use a brush cleanser every after use to immediately clean off residual make up from the brushes. In this way, you get to have a clean set of brushes each time. It's a very simple method and only requires a few minutes of your time. Materials needed are clean paper towel and any brand of makeup brush cleanser.


1. Lay your brush on a dry paper towel and pour a small amount of brush cleanser on the strands.
2. Brush the bristles back and forth on the paper towel, you will notice residual make up staining it, do this for a few minutes or until the brushes don't give off stain. For bigger brushes, you may need to do a circular motion to reach the inner portion.
3. Allow the brushes to lay flat on a clean paper towel to dry (this usually takes a few minutes depending on the type of cleanser you use).


          If you don't have a makeup brush cleanser, you may use facial cleansing wipes. All you have to do is brush the bristles back and forth directly on the moist towel until no stain comes off. Lay flat on a dry surface and allow to dry.


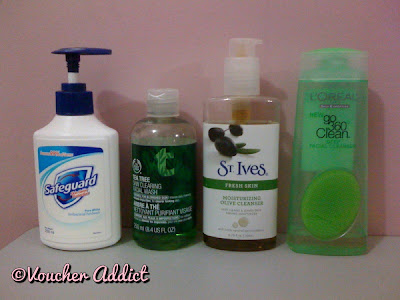
          Deep cleaning on the other hand is done less frequently with the use of a mild baby shampoo, facial cleanser or antibacterial hand wash. I've tried several of these but I am currently hooked on Safeguard Antibacterial Handwash which I also use to clean my Clarisonic brush head. I sometimes use facial wash with tea tree like The Body Shop Tea Tree Facial Cleanser. Tea tree has antibacterial properties that are not too harsh or drying hence can better preserve the quality of make up brushes. You may also use your less favorite facial wash or nearly consumed facial cleansers.

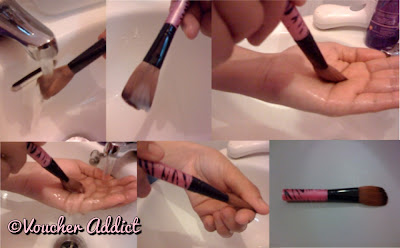
          Deep cleaning once a week is enough to keep your brushes in good shape and prevent your skin from breaking out but if you spot clean your brushes after each use or you don't use make up brushes everyday you may do deep cleaning every 2 weeks. All you need is an antibacterial wash, water and paper towels to do the following:


1. Wash the bristles under running water with the tip of the brush pointing down. Avoid getting the metal part of the brush handle wet.
2. Apply a few drops of liquid wash on your palm or directly on the bristles.
3. Swirl the brush on your palm repeatedly in a circular motion and allow to lather.
4. With continued swirling, put your palm under running water to rinse off the brush. Continue doing this for a few minutes until the water is cleared of dirt or makeup residue.
5. Gently squeeze the brush to remove excess water and allow to lie flat on a paper towel overnight or until the bristles are totally dry.

totalbeauty.com

          It doesn't really matter if you spot clean or deep clean your brushes or both, what matters is you CLEAN them regularly. Always remember that a few simple steps can help a lot in maintaining a healthy skin. After all, it is your most valued investment.

Not Just Another BB Cream

Thursday, April 5, 2012

          It seems like my quest for the best BB cream is never ending. Given many choices by different product companies in the market, how can anyone resist the temptation? I love the way these companies come up with new products that are improved based on what their previous line or other brands lack. This only proves that they do address their consumers' concerns.

          I had a lot of things I wanted improved in a BB Cream and Tony Moly made them all possible with the release of yet another amazing product, the Luminous Goddess Aura BB Cream.


          It comes in a squeeze out tube and has a texture similar to a light cream making this product glide smoothly on your skin. It easily blends with your complexion and doesn't cake even after a few hours. It gives your skin a lighter touch with a dewy and fresh look much like Neutrogena Fine Fairness BB Cream but with better coverage. Its coverage is more comparable to Missha M Perfect Cover BB Cream but has a more blendable texture.


          So far, this Luminous Goddess Aura BB Cream is the only product I've tried that offers full coverage and applies effortlessly on your skin. You may use this alone or finish it off with loose powder. Hands down, this product has filled in what other products failed to offer, truly an all-in-1 BB Cream.

NOTES:
*Tony Moly recommends this product to be used with their Luminous Goddess Aura Beam but I am using this alone on top of Tony Moly's Luminous Sheer Base.
**Products mentioned in this blog are personal preferences and are not in any way intended for advertisement.